
HOW TO STARt THE RENOVATION PROCESS-WEEK 4

So, here we are with the final piece of the renovation puzzle … getting the professionals (ie. the experts) involved in your renovation. If you’ve just joined us you will likely want to take a few steps back and catch up, and you can do that here where you’ll find parts 1, 2, and 3 of our Renovation Series.
Part-4: Getting the Professionals Involved in Your Renovation

Okay, you’ve considered your options and have decided what you’re going to renovate, you’ve come to a decision on how much you can afford to spend on this renovation, and you’ve worked out what you like and what’s your personal style. I’m sure you’ve had fun getting to part-4 … but there’s even more fun to come (and the immense satisfaction of a completed reno!).
Obviously, there are professionals that it is in your best interest (and in some cases a legal requirement) to get involved in any renovation project: builders or carpenters, tilers, roofers, painters, glaziers, bricklayers, plasterers, plumbers, and electricians.
The other professional that you are well advised to engage (or at the very least consult) is someone like me: a professional interior designer.
Why you might be wondering? After all, you’ve decided on a budget, you know what sort of fixtures and furnishings you want for your home so why can’t you simply book the trades and away you go?
Well, my friends, it’s because in the long run a professional interior designer can save you lots and lots of dollars! I am a qualified interior design professional with more than 12 years’ experience in ensuring that your renovation doesn’t go haywire, and that the result of all the hard work is a home that you love and will be proud of.
Need more convincing? Here are five top reasons why getting an interior design professional should be at the top of your list of priorities when planning a renovation:

1. You save money
Many renovators believe they can save more money, or at least stay within budget, if they go the DIY route. The reality is, that this is pretty much never the case! More often than not, DIY renovation projects top the allocated budget because of unforeseen issues, which a professional could have easily avoided by using their expertise, skills, and knowledge in the field. Not to mention the huge benefits that come with a professional’s supplier contacts and trade prices. Contrary to what you might think, investing in an interior design professional really does save you money!
2. Set a realistic time-frame
When renovating it’s so easy to underestimate the time different parts of the project will take, and added to that are the unforeseen delays that can hold up progress in different areas. Because an interior design professional has the experience gained through many renovations we know where delays are commonly caused and we also know ways to work around those delays. We can give you a realistic expectation of how long the whole renovation project will take and how you can plan for the steps along the way that may require your action (eg. moving off site for a period of time).
3. An interior designer has the ideas!
You’re done the thinking about styles, finishes and colours, and you’ve put together an amazing mood board, but when it comes time to put all that into practice are you absolutely certain that you’re confident in putting it all together? This is where the partnering up with someone who has done this a lot more times than you have is a top-notch investment! Getting an interior design professional involved from the planning stage can give you access to ideas that you can incorporate into your own to get to a result that will maximise space, functionality, liveability and of course keep your personal style.
4. Efficiency!

A professional interior designer has the experience to communicate with your trades and to keep a watchful eye on the progress with your end vision always at the forefront. A renovation is always going to be stressful, and don’t let anyone try and convince to otherwise! But, if you can have someone to oversee the finer details and keep your project manager on her (or his!) toes, why wouldn’t you? After all that end vision is what you’re aiming for and having an interior design professional involved who understands your vision from the outset gives you the upper hand.
5. Adding value to your home!
This is a big one because seriously if you’re going to spend lots of dollars (or even a little) you really do want to ensure that you’re getting more bang for your buck by increasing and maximising the overall value, don’t you?! Interior design professionals have quite a few tricks up our sleeves to bring more functionality and eye-catching style to your home which in turn adds $ signs to the market value.
How are you feeling about your reno project? Nervous? Excited? It’s pretty normal to feel both of those emotions and I hear the same from all of my clients when I meet them … but the end result makes it all worthwhile! The final step in getting your reno project started is to … start!
And starting is as easy as getting in touch with me, booking a FREE online consultation to discuss your plans and to showing me your mood board (I’m always excited to see a mood board!).
We’ll run through the details and look at how we can make it all come together. I really can’t wait to see what you’ve got planned!
As a side to the whole renovation excitement, I want you to know that during this period of isolation and physical distancing I am still very much at work and ready to consult with you about your plans! The only difference is that we’ll be consulting virtually through Zoom … you’ll still be able to show me your plans and your mood boards and of course we’ll be able to talk through what you want to achieve and discuss how we can make that happen. Please drop me an email or click below and we’ll tee up a time to chat!

How to work from home productively
With the current situation we are in, many workplaces are asking employees to work from home. 👩🏼💻 As a small business owner who operates from a home office, I thought I’d share a few tips (video below) on how I work productively...and no, it doesn’t include “quickly putting a wash on”!

TIPS ON HOW TO WORK PRODUCTIVELY AT HOME:
Treat working from home just like you would do in the office.
Take regular coffee/tea breaks away from your desk.
Have lunch away from the desk and try and head out in the backyard/balcony for some sun.
Avoid housework, even if you think it will take a couple of minutes. It will interrupt your flow.
Work from your dining table, or desk- try and avoid your sofa or island bench.
Keep your work space clean and clear of clutter.
A wifi extender can help your internet connection.
Use a wireless keyboard and mouse.
Look for a HDMI cable to connect your laptop to a monitor.
Find a comfortable chair with a backrest.
Try and complete those important tasks first thing in the morning. Then phone calls and emails afterwards.
Interaction is so important right now- Zoom or video call your colleagues rather than an an using a chat based software. (It’s also easier to catch up on the goss!)
A few things to consider when setting up your home office is to ensure you have adequate lighting, a comfortable chair and smart storage solutions so you can quickly put away paperwork away for the day.
Whether you are working from the dining table or can set up a study in a spare bedroom, you can still achieve a practical yet stylish space.
I have put together a mood board with products can be purchased online and are in stock (at time of writing this).

Get the Look
Here is where you can shop for these items:
Desk- Ikea
Desk Chair- Interior Secrets
Round Floor Rug- Oz Design
Artwork- Boho Art & Styling
Table Lamp with USB charger- Beacon Lighting
Planter- Zanui
Document Organiser- Ikea
Desk Organiser- Ikea
Cushion- Onyx & Smoke

If you are still feeling overwhelmed on how to furnish your work space or any room in your home, I’m offering 15% off my exciting new e-Design service! This affordable and online decorating service is a great way to work with me remotely regardless of your location and budget!
Now more than ever we deserve to have a home where we feel safe, comfortable and beautiful!
We can work together to help you redecorate your Lounge, Dining, Bedroom or even your Entry. This process is done all via video call and email.
Here is what’s included in the affordable package options:
x1 60 minute Initial Design Consult via video call to chat about your overall vision of the space you would like to redecorate.
A Mood Board for each room which will include images of suggested furniture, rugs and lighting options.
A floor plan showing furniture layout.
A comprehensive Shopping List which includes details of each item, price, size and colour.
Email/phone support with Melissa.
Opportunity to access trade only suppliers to ensure you have a one-of-a-kind look.
Furniture items to be ordered on your behalf so you do not have to deal with each supplier. Delivery dates will also be booked in for you ready for you to start installing your newly decorated space.
x1 30 minute post delivery video call to answer any final questions.
Room packages start from $450 + the 15% discount!
Check out how the e-Design Service works below and upon filling out the Design Questionnaire, mention this blog post to redeem your discount.
HOW TO START THE RENOVATION PROCESS
WEEK 3- HOW TO CREATE YOUR OWN MOOD BOARD
How are you going with the How -To Renovate series?! I absolutely love seeing your ideas and questions come through via email … WOW, you’re so involved in this process, I love it!
If you’re just tuning in now, it’s not too late to get involved (actually it’s never too late because this series is designed to be easy to start at any time!) and you’ll find part-1 and part-2 here.
If you want to bounce ideas or have any questions along your renovation journey, (or just need help!) let me know and we’ll work it through together.
Part-3: Create your own mood board

Now that you’ve determined what area you’re going to renovate (part-1) and what your budget is (part-2), it’s now time to look at how you want your space to look and feel.
Are you ready for a surprise? Hold onto our hats, my friends … the style you love and the style you are dreaming of for your newly renovated space may not have a name! That’s right, it may not be Hamptons, Hygge, contemporary, industrial, or any other popular ‘style’ … but, what it will be is your style! That’s what’s most important after all.
How to find your style?
Where do you go for your inspiration? My traditional favourites for inspiration are print magazines, catalogues, and then of course are our online top choices such as Pinterest, Houzz, Instagram and Blogs.

Some of my favourite social media accounts for inspiration are:
Mim Design Studio @mimdesignstudio
Flack Studio @flackstudio
Carla Coulson @carlacoulsoncoaching - I love her travel adventure photos!
Holly Becker @decor8 - this was one of the first blogs I followed years ago before blogging was huge! Her books are very insightful too for tips on how to decorate.
The Design Files @thedesignfiles
Rachel Castle @rachelcastleandthings - her artwork is so uplifting and makes me so happy!
Some of my go-to magazines are:
Inside Out
Inside
est Living
Habitus Living
I’m pretty sure that you’ve already got your own fave magazines and social accounts where your imaginations run wild daily! That’s great, add them to the list!
Okey dokes, stay focused people! I know that at this point it’ll be easy to get lost in dreamland.
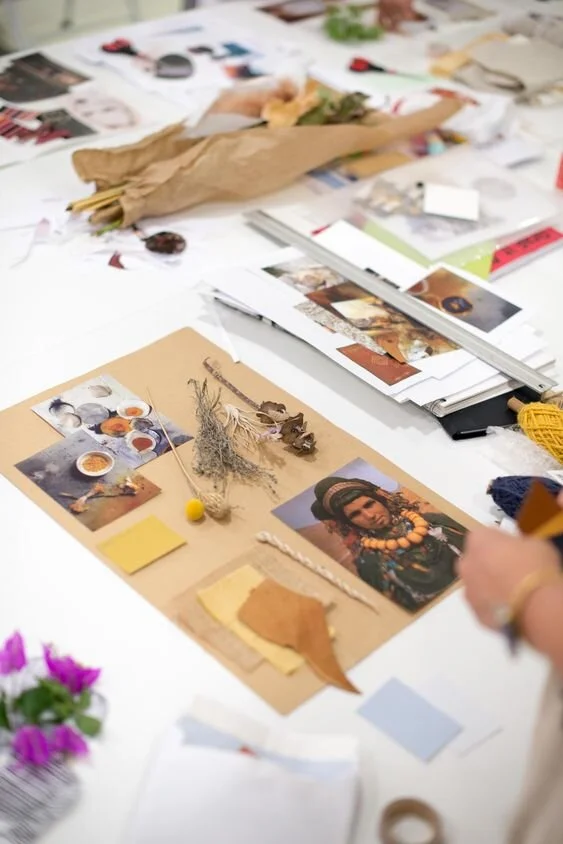
The second step is to bring all of these images together and make sense of it all.
There are two options to create your mood board: the old-fashioned ‘on paper’ method, or an online version. Either way is perfectly fine and it’s really a matter of which works best for you (it’s as individual as your own personal style!).
‘On paper’ method:
From your local newsagent or stationers buy some heavy A3 card stock and a glue stick. Using your hard-copy magazines cut out the all the images that appeal to you and start laying them out (no gluing yet!) and collating into themes.
Digital method:
If you’re solely using Pinterest or Houzz you can save your images to boards that you create within the app itself – name your board to match the space you’re renovating (eg. Laundry ideas, Main bedroom ideas, etc).
A great alternative to Houzz or Pinterest is online digital mood board programs. One of my faves is Style Sourcebook. It’s super easy to use and there are lots of preloaded furnishings, colours, and finishes pre-loaded too – there are plenty of others so choose which one works best for you.
By now you’ll be itching to do something with all these images you’ve collected, so let’s get stuck in! Look all the images you’ve laid out … you should start to see a pattern. Maybe you notice lots of images with of whitewash furniture or antique pieces,or bathrooms and kitchens that re quite contemporary or earthy? ? Play around with your images and take away the ones that aren’t working. After adding/taking away and trying different pairings you’ll find that your scheme has evolved. When you’ve reached the point that your collection represents what you’d like your newly renovated space to look like it’s time to get out the glue stick (or create a new digital board) and create your mood board!

Having either your hard copy board or your digital board on your laptop or iPad will be super helpful when you’re shopping for tiles, benchtops or meeting with your architect or designer. You’ll also find it an essential ‘go-to’ when you’re shopping for furnishing items too!
When you break it down, it’s pretty simple! So much fun too! But … I’d also like to jump in here and say as fun as this step is (and as simple as it is) it’s quite OK to be overwhelmed and uncertain in your choices. That’s where a professional interior designer is one of the best investments you can make in your renovation project. Don’t forget, I’m right here in this process with you and if you feel that you need a sounding-board or a ‘reno partner’ get in touch with me and we’ll chat about the next step.
Next time in Part-4 we’ll be discussing the when, what and how of getting professionals involved in your renovation.
HOW TO START THE RENOVATION PROCESS
WEEK 2- HOW TO BUDGET FOR A RENOVATION
I’ve been receiving some fantastic feedback to our first article in our 4-Part “How to start the renovation process” Series! It seems like many of you are wanting to renovate but struggle with knowing where to start!
If you missed the first article in the series you’ll find it here. It’ll be easy for you to catch up and be ready for Part-Two in no time … and if you get stuck at any time let me know and we’ll work it through together.
Part Two: How much am I going to spend
This week we’re looking at the all-important budget. It would be nice to have an open-ended budget but the reality is that none of us have that luxury!
So, what’s your budget? In Part-One you worked out whether you are doing a room, several rooms, or a full gut and re-do, what restrictions might be on any renovation for your property. Now we’re going to look at how you can make that work for your bank account whether your tastes are champagne or sparkling wine budget.
Renovations can cost as little as $3,000 for an uplift or revamp of existing fixtures and fittings, or as much as $300,000 $500,000 for a full “out with the old, in with the new” transformation. The biggest expenses in any renovating are labour and materials.

Open your trusty notebook and following on from your assessment of the space/s you’re wanting to renovate let’s get to work on Part-Two:
1. The size of your renovation project will vary too: a full gut and renovation of an apartment will (in most cases) be significantly less than the full gut and reno of a 4-bed house. You should allow around $2,000-$5000 per square metre of renovation area.
2. What materials will you be using? You’ll need to consider that a material such as weatherboard might be cheaper to start but it doesn’t have the long-term low maintenance and durability of brick. In living areas carpet or timber flooring have differences in cost outlay as well as long-term care. For your kitchen, bathroom, and laundry benchtops engineered stone instead of granite is a more affordable option.
3. What did you determine about plumbing and electrical work? Wherever possible it’s a much cheaper option to keep your plumbing outlets in the same position – you’ll still need a registered plumber to disconnect and reconnect but that’s a lot less costly than relocating the outlets. It’s difficult to give an estimate on electrical and plumbing costs but at this point you’ll have an idea of how many new plumbing or electrical connections you’ll be needing so a quick phone call to a couple of local registered tradies for an obligation-free over the phone estimate will help you with this step – all you need is an estimate of how much they charge per install.
4. How much of the renovation work can you do yourselves? Painting, basic carpentry, demolition? If you do not want to do the work yourselves, you could project manage yourselves or engage in a builder to do this for you. More about this in point 9.
5. Rubbish removal also needs to be considered: will you hire a skip or will your do a tip run? If you’re going to hire a skip bear in mind that it’s cheaper to fill the skip over a day or two than it is to have it on site for weeks on end – if you’re going to fill it over a day or two will you be able to store all the rubbish until you’re ready to put it into the skip?
6. If it’s a major renovation (or kitchen or bathroom) where will you stay while the renovation is in progress? Do you need to move offsite for the duration or part of the duration?
7. What council permits do you need? If you’re not sure if you’ll need a permit make sure you get professional advice. Renovating without permits can be VERY costly if your council become aware!
8. It’s ALWAYS a good idea to consult a design professional with renovation experience. There are different levels of support that a professional interior designer can give you: whether it’s a consultation on colours and fixtures furnishings, assistance with a floor plan or cabinetry layout, or all of the above, it’s definitely a worthwhile investment, which gives you an assurance of a quality finished renovation and it also takes the stress off your shoulders. {raising my hand} I can help you here!
9. Project management of the renovation: is that something you’ve got experience in? It’s not as simple as choosing the materials and booking the trades … it can be super costly to have trades turn up and not be able to do anything because another trade hasn’t done their bit, or to under (or over!) estimate on materials. Engaging in a project manager or builder can help with this.
10. How much can you AFFORD to spend? Now’s the time to consider how you are actually going to pay for your renovation. Is your renovation something you’ve saved up for, do you need to take out a bank loan? What is the $amount that you have available for your renovation project? You also need to factor a contingency amount within the budget of approximately 20% into your budget; renovations are a tricky business and you don’t know what you’re going to come across once you start knocking down walls! Maybe you won’t need that contingency amount (yay!), but there’s not much that’s more stressful than running out of money before your renovation is finished.

At this point you might be too scared to look at what you’ve written down … don’t be! The reality of renovating is that it costs money, but it also adds value to your home. By budgeting wisely and thinking realistically you can achieve your dream home.
No doubt you’re feeling a little overwhelmed – all you wanted was an extra room or two and a fresh bathroom, right?! I’m here for you … if you’re stuck or needing advice send me an email and I’ll do my best to help you through.
In Part-Three we’re looking at the fun stuff: Pinterest boards, styling ideas, colours and furnishings. We’ll be looking at how to create your own design aesthetic!
How to start the renovation process?
WEEK 1- FOCUS ON THE SPACE YOU WANT TO UPDATE

Welcome to our new 4-part series: “How to start the renovation process”. Together we’re going to tackle the reno process step by step from the ideas that strike you in the middle of the night, to hiring the professionals to bring your dreams to reality!
Whatever it is in life, there is a first time for everything, and renovating is no exception. Hey, even second or third time renovators can get lost in the Pinterest boards, Instagram feeds, and of course important things like budget and what you’ve got to work with can go right out the window when you’ve got a never-ending stream of pretty things and amazing ideas in front of you!
Where to start?! Well, we’re going to take this step-by-step and break it down so it all makes sense and loses the “ohhhh, what am I doing???” scary stuff.
Are you ready? Grab yourself a notebook (the old-fashioned kind!) and let’s go!
Week one: Focus on the space you’re wanting to UPDATE
We can break all renovations down to the seven most important aspects to consider before picking up any tools, or even buying the sample pots:
1. Are you wanting to renovate a whole house, or just one room?

2. What is it that you love about the space? What is it that you dislike? Make a list of the areas within the space that are not practical, what’s lacking and what does currently work.
3. Is the renovation small or major? Think change of colour scheme as opposed to knocking down walls and re-positioning plumbing.

4. Is your home heritage listed? If it is this will affect what you can (and can’t) do and at this point you’re very welcome to get in touch with us and we’ll step through what you’ll need to take into consideration – the reno isn’t out of the question, but there are factors that must be considered.
5. What is it about the space that you want to change? Do you need more living space? More bedrooms? Is the colour so depressing it makes you want to close the door and think of happy places?
6. Look at the lighting of your space: how much natural light do you get? Where is the sun in the morning or afternoon? Is there too much light? Will you need additional lighting or power points installed?
7. Are you going to need to extend the roofline, or put in additional plumbing? If you are, you’ll likely need to need to factor in time for council permits.
Your task for this week is to open your notebook and spend some time looking at your space with an open mind - forget the Pinterest boards you’ve been building … this is about what you’ve got to work with. We’ll get to the Pinterest boards a bit later on!
Now, I totally get that at any time in this process you might feel overwhelmed and find your mind wandering back to that vision you’ve been dreaming about, so I want you to know that if you get stuck and have a question you can shoot me an email and I’ll do my best to help get you back on track!
Next week we’re going to look at budget, and that’s truly not as scary as it sounds!
How to tie red into your colour scheme
Bunnings launched a new free magazine this year and I was asked to share my insights expertise on how to introduce red into your home.
Back in the early 2000’s, red was huge. You would see it in splashbacks, features walls and homewares.
With new, earthier tones replacing the brighter shades of recent seasons, red is the latest on-trend hue to use in your home.

Bunnings magazine, April 2019- original article
Seeing red
The colour of love, passion and fiery emotion, red is one of the most high-energy hues you can use in the home. From classic crimson popping up as accents to larger swathes of earthier hues, red is now easier than ever to work into an interior scheme. Tones being used on walls are warm and nurturing, with a nod to nature – and our own sunburnt country – in the form of desert shades. “The more reduced reds – think rust, burgundy, wine, berry – are what we are seeing come through in larger amounts in modern interior spaces,” says Taubmans colour consultant Grace Garrett.
Though totally on trend for 2019, these ‘reduced’ reds also have firm roots in the past, which makes them a good fit for an older-style home as much as a contemporary abode. Interior designer Melissa Lunardon explains, “Wine, terracotta and deep burgundy are a nod to the past, as they were used in Victorian times, and have now been reinvented.”
Why we love it
While the brightest vermilions are visually loud, muddier reds are comfortable to live with. Deep reds are warm, intimate and cocooning, while rusts and terracottas evoke an exotic, tribal ambience that fits beautifully with the ‘global nomad’ trend of richly textured, bohemian interiors.
Colour psychology labels red as energising, making it an excellent choice in spaces where you want to stimulate conversation as well as appetite, which explains why it’s often seen in dining areas. “Burgundy is often associated with high society, as its hue signifies sophistication,” adds Grace. “The combination of its psychological seriousness and powerful energy gives it a sense of ambition.”
Even in its more muted incarnations, red makes a bold statement and instantly lifts a dull interior scheme. It draws attention and conveys a strong sense of personality and confidence in design decisions.

For similar hues try (from left) Taubmans Blossom Pink, Raspberry Rose, Rose Velvet and Poinciana Red.
How to use red
At the entry, red offers a warm welcome to guests. “Deeper reds look fabulous on a front door and scheme beautifully with the greys and neutrals trending on the exteriors of homes,” says Dulux colour expert Andrea Lucena-Orr. Inside, an entry hall is a good place to commit to burgundy, creating a cosy transition from outdoors to in.
Though not every room lends itself to a titian transformation, there are spaces that look beautiful with a wash of red. “Formal dining rooms and formal entry areas look great in reds like British Paints Paint the Town, while in living areas, splashes of red add vibrancy,” says Kelly Magee of British Paints. Social rooms where you want to encourage conversation work well in red, though Melissa Lunardon warns, “Avoid bright red tones in an area where you rest, as it can overstimulate.”
Muted reds are also a natural fit for the outdoors; and the varied greens of garden foliage make for a much less ‘Christmassy’ pairing. Don’t overdo it, but a rich red or terracotta wall will accentuate your plants.

For similar hues try Taubmans Blossom Pink, Raspberry Rose, Rose Velvet and Poinciana Red.
Go bold in the hall; wall in Dulux Carmen.
Perfect match
As red is such a strong colour, it’s wise not to pair it with hues that will fight too hard for attention, the idea is to soften the look, so your room is soothing to be in and not anxiety reducing. The right neutral can simultaneously tone down a red and allow it to sing. “Definitely neutrals such as sands and earthy grey green pair beautifully with reds,” says Andrea. “Greys and greiges look amazing alongside deeper reds.” Also in line with a desert-inspired palette, Kelly suggests teaming it with mustard, tan and suede hues. “Colours like British Paints Ginger Tea, Grainstore and Vast Estate would nautical-inspired pairing, but the new earthy reds can work equally well with a touch of blue. “As burgundy is a power colour, rich and strong, it will pair well with stony white, crisp white, gold and blue,” suggests Grace. Lighter reds, such as terracotta, make a sophisticated painting with navy, or with a brighter bluey-green for a vibrant Moroccan look. “When selecting a white to go with red, you need to understand the undertones of the white to ensure it’s not too stark against the red”, says Kelly. A cool crisp white works well with brighter reds, but deep earthy reds are better suited to soft, warm whites; for example, British Paints Winter Chic, Dulux Natural White or Taubmans South Pole.

Pale terracotta pairs beautifully with fresh greenery.
Paint it red!
Get all your painting products to paint your next project red at your local Bunnings. While you're there, check out our range of decorator products to further spruce up your space.

Wall in British Paints Paint The Town
Photo credit: Cath Muscat, stylist Tilly Roberts, Lisa Cohen, stylist Bree Leech; Gap Interiors/Dan Duchars and British Paints; Brigid Arnott.
Breaking the Myth! Interior Designers are not just for the "rich and famous"!
If you were an interior designer about 10 years ago, your projects would consist of large mansions, penthouses or high end office fitouts with huge budgets.
With today's world FULL of DIY TV shows, Pinterest, Instagram and blogs, the everyday homeowner is starting to realise that they too would like a beautiful, well designed home.
That being said, people realise the process of building a new home or renovating an existing home can be a mammoth task and start to stress and feel overwhelmed at all the decisions that need to be made.


Hiring an interior designer in the early stages can save you time and money.
Think of me as your sounding board and sometimes your mediator between you and your partner!! I can offer you advice and suggestions that you may not have thought of and create a home that is uniquely you.
I promise you, you will not have a carbon copy home, it's too easy (and frowned upon) to copy something straight from an image, I want you to have a home that reflects your personality, lifestyle and family.
So while you are budgeting for your exciting new project, consider outsourcing the interior design to save you time, energy and your sanity.
My Initial Design Consult is only $300 and if you decide you want to work together further, the initial fee is fully refundable!
Click the button below to find out more!

How to Style your Coffee Table
Its quite simple to make a coffee table look great, you just need to start with the basics that you may have lying around the house.
BASICS FOR COFFEE TABLE STYLING
1. Start with a stack of books or magazines as its a great way to add height and colour to the table.
2. Add a tray next to the stack of books. This sections the area of the table and creates interest.
3. Add a natural element to carry through some texture. A nice bunch of flowers in a short vase, a crystal, coral or a timber branch. You can place this on the stack of books, or in the tray.

4. A scented candle always smell divine and add that special glow at night.
5. Lastly, add in some personal items whether it be trinkets from travelling, an old vintage time piece, or a patterned jar.
HOW TO CREATE BEAUTIFUL VIGNETTE
A vignette is a curated collection of homewares, trinkets and personal items that are grouped together. You can effortlessly style your home by following these simple steps to create a cohesive look:
Start with larger items such as a vase, table lamp or artwork.
Then continue adding to the cluster but remember to work in odd numbers- 3 or 5 work best.
Bring in pieces that have a personal meaning. You don't want your home to look like a display home- your home should be a reflection of you and your personality.
Play around with different heights and scale If you are styling with books, play around with some stacked and some standing up.
Adding greenery always bring the space to life Take a step back and see how it looks- it may need some tweaking and that ok. Remember not every surface needs to be covered and the eye needs to rest so having an empty space is a good thing!


Bathroom Design Workshop with Reece Bathrooms
FREE BATHROOM 101 WORKSHOP WITH REECE
I have teamed up with Reece Bathrooms to host an exciting Bathroom 101 Workshop next month!
If you are planning on renovating your bathroom this Spring and need some ideas to get started, come along to get you prepared!
This is a FREE event hosted at the Reece Brighton showroom.
In this workshop, we’ll take you through all the need-to-know information you’ll need to complete a successful renovation and create a bathroom that’s better than you ever imagined.
We’ll be covering:
How to find your bathroom vision
The top trends we’re seeing in Australian bathrooms
Tips for planning your bathroom renovation and how to effectively plan your space
A step-by-step outline of the bathroom renovation process
We’ll also provide you with our latest Bathroom Kit, packed full of knowledge to set you up for your renovation.
We can’t wait to see you on the day to get you started!


Coastal Modern Mood Board- How to get the Look
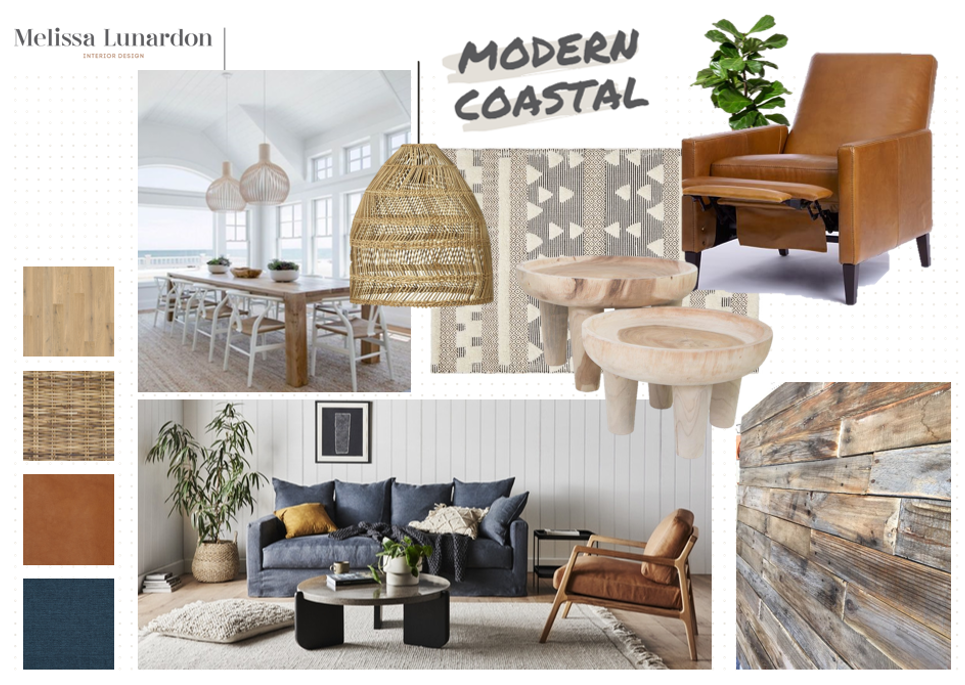
I have been working with some great clients at the moment who have approached me to furnish their Living/Dining and Master Bedroom.
During our Initial Design Consult, I ask lots of questions to understand the brief to ensure I understand their requirements, style and outcome.
With all this information, we start off the design process with the Concept Stage.
The Concept Stage includes a Mood Board which is a collection of inspirational images, and suggested colour palette to give you a sense of the overall look and feel of the space. It's a collection of thoughts and feelings all in once space to help form a clear design direction so we don't go off tangent when it comes to the shopping component of the process!
Above is a Mood Board I put together for my clients and based on their brief from the Initial Design Consult, they want their new home to feel warm, inviting and reflect the beautiful beach-side environment.
To create a Modern Coastal interior, below are a few tips to help you on your way:
Incorporate a mix of timber, rattan and linen to create a relaxed feel
Pops of tan leather and navy are very popular at the moment and that's because these two tones work so beautifully together.
Furniture should be comfy and relaxing. Think plush sofas in removable/washable covers.
Introduce soft sheer curtains for your window treatments.
Keep your homewares to a minimum. The overall feel should be light and airy.
If you are struggling to visualise how your home can look, get in touch. We can work together on one room or your whole house.
My design process is easy and I can guide you on how your home can reflect your style and personality. It's important to gather all this information first, otherwise, you will be walking through furniture showrooms blindfolded and utterly overwhelmed!!
How can an Interior Designer save my sanity?

Let's get straight to the point. Building/renovating is bloody expensive. It's stressful and sometimes can be overwhelming. "What do you mean there is more than one one to choose from?"
Yes, hiring an interior designer is an added cost to consider, but can save you time, money and your sanity down the track. Let me explain how:
Part of my services includes sitting down together and sketching up layouts for your Kitchen, Bathroom, Ensuite, Laundry or other areas of your home. I provide detailed drawings to show you how each room will look and we will work together until you are completely happy with the outcome. We will note how high the tiles will be in the bathroom to which side you would like your dish drainer to go in your kitchen.
If you have problems visualising, that's not a problem! I provide 3D rendered drawings so you can get an idea of how it will look.
Once the drawings are confirmed, we will then work together to start selecting paint colours, flooring, benchtop, cabinetry, tapware, appliances, carpet... the list goes on. There is lots to select but I will assist you throughout the whole process, give you advice and point you in the right direction on trusted suppliers and brands.
We will visit showrooms together but if you don't have the time to do that- I will do the running around for you and present you with a suggested colour palette for you to approve.
Your style, budget and lifestyle are all taken into consideration throughout the whole process.
So now that the drawings are finalised, and colours are all selected, I can then issue you with a documentation package.
This includes:
- Full set of detailed drawings including elevations
- Colour and Materials Schedule
- Sample Board
What do these documents help with? Finding the right builder of course!
You can then hand these documents over to a few builders to start quoting. It is important that the builder includes all items listed in the Colour and Materials Schedule and drawings.
This means you will receive a fairly accurate price upfront and should eliminate any variations down the tracks.
Some builders just quote on standard items and then when it comes to ordering all your items, they realise the tiles we selected are 600x600 porcelain tiles and not the standard old 400x400 ceramic tiles he allowed for in his quote. It then means you get a rude shock and handed a variation every time this happens.
His quote might come back cheap at the start, but boy will it blow out once construction has finished.
Then finally once you have found the right builder, works can commence and the builder and myself can communicate together throughout the construction process to iron out any questions he may have.
So as you can see, there is more to an interior designers service offering other than "fluffing cushions".
As mentioned earlier, there are lots of elements to consider when starting your renovation or new build project and someone like myself can alleviate the stress and ensure you have a beautiful home that reflects your personality and needs.
Click on the button below to get in touch and we can arrange a quick phone call to discuss what stage you are at in your project and how we can work together.